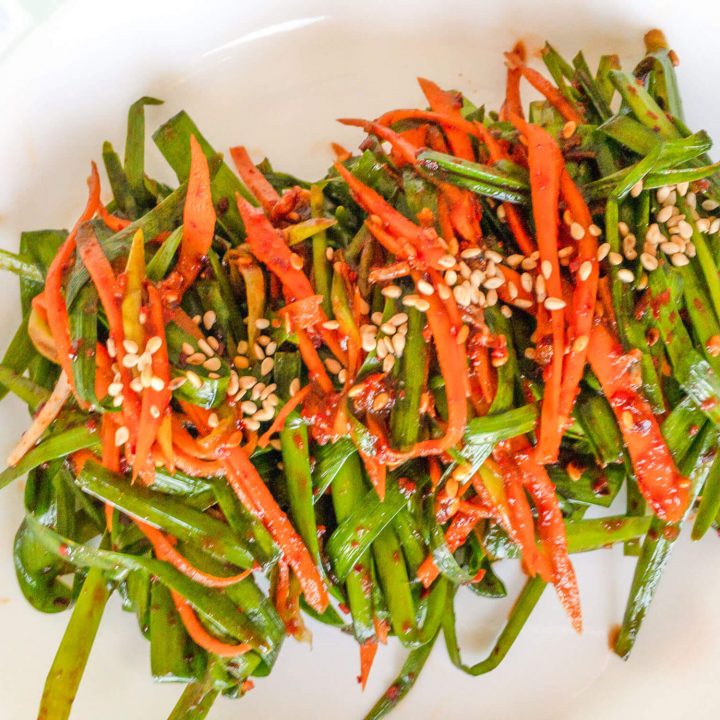
A quick and easy Korean kimchi made with garlic chives (buchu). Make this chive kimchi the day before you want to eat it for the best results. This easy kimchi is also a gluten-free and soy-free recipe.
This garlic chive (buchu) kimchi is so easy to make. If you want a super easy kimchi to make, then you have to try out this recipe. There is not as much work in making this kimchi as there is when making a more traditional napa cabbage kimchi. The hardest part is shredding the carrots if you didn’t buy a bag of matchstick-style carrots.
Key features and tips
Garlic chives (buchu) are the main component of this kimchi. The leaves of this type of chive are flat and not rounded like some other more typical chives you have probably seen in the grocery stores. These garlic chives are part of the onion group, so that is why you will notice we don’t use onions or garlic in this recipe.
We recommend letting this kimchi marinate at room temperature for about 10-12 hours. This will help to kickstart the fermenting process. So, make sure you make this a day before you want to enjoy this kimchi with family and/or friends.
What are garlic chives (buchu)?
The specific chive we are using in this recipe is allium tuberosum. There are many other names this chive species goes by such as garlic chives, Oriental garlic, Asian chives, Chinese chives, or Chinese leek. They are a perennial plant and are very easy to grow in many parts of the United States. They are cold-hardy for USDA Zones 4-10. My mom grows these chives in her garden, so she always has some on hand during the growing season. They’re so easy to grow yourself too! Here is a link to some seeds we found online.
By www.aziatische-ingredienten.nl, CC BY-SA 2.0, Link
In Korea, this particular chive is known as buchu (부추) and is widely used in Korean cuisine. You will find these garlic chives being used in kimchi, dumplings (mandu), can be eaten fresh (namul), or in savory pancakes (pajeon) just to name a few. We have several recipes that use garlic chives, such as Korean Garlic Chives Salad (Buchu Muchim), Korean Soybean Paste Stew with Mugwort & Wild Chives (Doenjang Guk with Ssuk and Dallae), or Spinach & Chive Fresh Kimchi (Geotjeori 겉절이). So if you get your hands on any, don’t worry, there are many different recipes to use them in.
Ingredients needed to make this garlic chives kimchi (buchu)
- Fresh garlic chives
- Carrots, shredded or matchstick style
- Korean red chili pepper powder (gochugaru)
- Brined/salted shrimp
- Fish sauce
- Sugar
- Toasted sesame seeds
How to make this easy chive kimchi
Step 1: Mix everything together
Combine all the ingredients together and mix well.
Step 2: Let marinate
Let it marinate together all day, for about 10-12 hours at room temperature.
Step 3: Enjoy!
It’s ready after the 10-12 hours or the next day. Enjoy!
What to eat with this type of kimchi
We, of course, love eating this with freshly steamed rice. It is also really delicious alongside ramen. We have even pan-fried tofu slices and will eat them on top of the tofu slices for a low-carb option. Another low-carb option is to serve this alongside your choice of protein. This would be great alongside our beef bulgogi, Asian stir-fried beef, or chicken bulgogi.
How to store it and how long it will last
Eat this fresh (after the 10-12 hours of marinating) or you could let it ferment further. This should keep for about 4-5 months in the fridge. During the 4-5 months, it will continue to ferment and start getting that sour bite.
HUNGRY FOR MORE? Subscribe to our newsletter and follow along on Facebook, Pinterest, Twitter, and Instagram for all of the latest updates.

Garlic Chives Kimchi (Buchu)
A quick and easy Korean kimchi made with garlic chives (buchu).
Ingredients
- ½ lb fresh garlic chives, rinsed/cleaned, leave it in long pieces
- 1 cup carrots, shredded
- ½ cup Korean red chili pepper powder (gochugaru)
- 1 Tbsp brined/salted shrimp
- 2 Tbsp fish sauce
- 1 Tbsp sugar
- 1 Tbsp toasted sesame seeds
Instructions
- Combine all the ingredients together and mix well.
- Let it marinate together all day, for about 10-12 hours.
- It's ready after the 10-12 hours or the next day. Enjoy!
We love seeing your creations from our recipes! Tag us on Instagram at @AsianRecipesAtHome.
Disclaimer: Under no circumstances shall this website and the author(s) be responsible for any loss or damages resulting from the reliance of the given nutritional information or ingredient/product recommendations. Recommended ingredients/products can change their formula at any time without this website and author’s awareness. It is your responsibility (the reader’s) to check the label/ingredients of any product prior to purchasing and/or using. We greatly appreciate your support and understanding.


